6.3 Removing and Installing Transaxle
The transaxle must be removed from the car for most internal repairs or for replacement. In the procedure given below, the transaxle is separated from the engine, supported on a jack, and removed from below. Alternatively, the engine and transaxle assembly can be removed, as described in ENGINE, and the transaxle then separated from the engine.
Removal of the transaxle requires a means of lifting the engine, a transmission jack or a floor jack with transmission adaptor, and jack stands to support the car. The engine lift is necessary because the engine mounts are removed. Use extreme caution when working beneath the car and lowering the transaxle.
To remove:
| 1. | Disconnect the battery negative (-) terminal. Disconnect the ground strap from the transaxle. Disconnect the electrical connector from the reverse/upshift light switch atop the transaxle. |
| 2. | Remove the speedometer cable and insert a plug in the hole to prevent loss or contamination of the transaxle lubricant. |
| 3. | Disconnect the clutch cable from the clutch release lever as described in 5.1 Clutch Cable. |
| 4. | Loosen the left front wheel lug bolts. Then jack up the front of the vehicle, support it securely, and remove the left front wheel. |
| 5. | Remove the short selector rod and the long connecting link from the two relay levers of the shift linkage. If necessary, see 4. Shift Mechanism. |
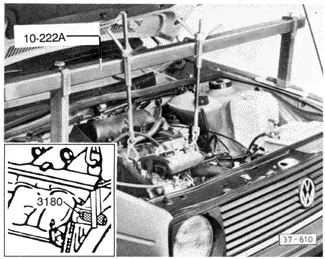
| 6. | Install an engine support, as shown in Fig. 6-14, and increase tension until it supports the weight of the engine. |
NOTE-
On 16-valve models, the right (driver's side) lifting hook of special tool no. 10-222A attaches with special tool no. 3180 to an eye under the intake manifold. It is necessary to remove the idle stabilizer valve to prevent damaging it.
|
| Fig. 6-14. | Engine being supported by support tool. Volkswagen special tool no. 10-222A shown. Inset shows special tool 3180 for use on 16-valve models. |
|
| 7. | Remove the upper bolts that hold the transaxle to the engine. |
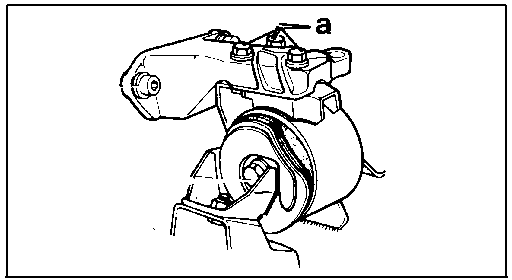
| 8. | Remove the three bolts from the right rear engine mount as shown in Fig. 6-15. |
| Fig. 6-15. | Typical right rear engine mounting bolts a. |
|
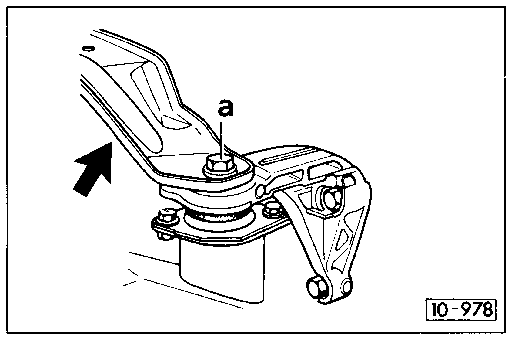
| 9. | Remove the center bolt from the left rear transaxle mount as shown in Fig. 6-16, then remove the two through-bolts and nuts holding the mount's support arm to the transmission. |
| Fig. 6-16. | Typical left transaxle mounting bolt a that needs to be removed. Arrow indicates support arm. |
|
| 11. | Remove the left wheelhouse liner mounting screws and washers, and remove the wheelhouse liner. |
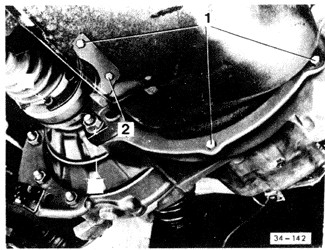
| 12. | Remove the bolts from the clutch cover plate as indicated in Fig. 6-17 (the cover plate will remain on the engine when the transaxle is removed). Remove the bolts from the small cover plate (located behind the left drive flange). |
| Fig. 6-17. | Clutch cover plate bolts at 1 and small cover plate bolts at 2. |
|
| 13. | Place a transmission jack or a floor jack with transmission adaptor beneath the transaxle. Raise the jack just enough to support the transaxle. Do not raise the engine. |
| 14. | On 16-valve engines, remove the engine damper. |
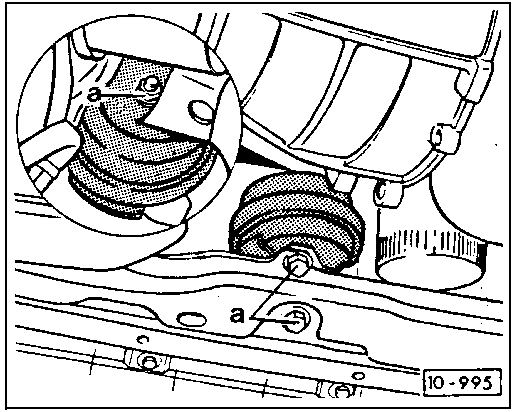
| 16. | Remove the front engine and transaxle mount as shown in Fig. 6-18. Completely remove it from the car. |
| Fig. 6-18. | Front hydraulic engine/transaxle mounting bolts a. Earlier rubber mount is similar. |
|
| 17. | Slightly lower the transaxle and remove the left mounting bolt that was concealed by the small cover plate, where applicable. |
CAUTION-
At no time should the weight of the transaxle be supported by the transmission main shaft. Such a load will damage the clutch and transaxle components.
|
| 18. | Push the engine and transaxle assembly as far as possible toward the passenger side of the car. Remove the remaining lower mounting bolts holding the transaxle to the engine. |
| 19. | Separate the transaxle from the engine, taking care not to place any strain on the transmission main shaft, and either lower the jack or raise the car until there is enough clearance to remove the transaxle. Pull the transaxle out from under the car. |
WARNING-
Make sure the car is stable and well supported at all times during the removal procedure. Use jack stands which are designed for the purpose. A floor jack alone is not adequate support.
|
To install:
| 1. | Lightly lubricate the input shaft splines with molybdenum disulphide grease, then position the transaxle on the engine, being careful not to damage any of the clutch components. Check that the large clutch plate is correctly positioned. If necessary, use a wrench on the crankshaft pulley to align the splines of the main shaft to the splines of the clutch disc. |
| 2. | Install the lower transaxle to engine mounting bolts and then install the upper bolts. Torque the M12 bolts to 75 Nm (55 ft. lb.). Install the small cover plate for the concealed bolt. |
| 3. | Install the left rear transaxle mount, but do not fully tighten the bolts and nuts. |
| 4. | Reconnect the drive axles to the transaxle drive flanges. Torque the 8mm 12-point socket-head bolts to 45 Nm (33 ft. lb.). |
| 5. | Install and torque the clutch cover bolts to 15 Nm (11 ft. lb.). |
| 6. | Install the left wheelhouse liner with mounting screws and washers. |
| 7. | Install the bolts to the right engine mount and install the front transaxle/engine mount, but do not fully tighten the bolts and nuts. |
| 8. | Install the starter. Torque the M10 bolts to 60 Nm (44 ft. lb.). Install the reverse gear/upshift light switch and attach its connector. Torque the bolts to 10 Nm (87 in. lb.). If removed, install the plastic plug in the timing check hole. |
| 9. | Reinstall the left front wheel and tighten the lug bolts. Lower the car to the ground and torque the bolts to 110 Nm (81 ft. lb.). |
| 10. | Reconnect the shift mechanism and loosely install the clutch cable to the release lever. Connect the speedometer cable to the transaxle housing. |
| 11. | Remove the engine lift or hoist. Reconnect the battery negative (-) terminal and the ground strap. |
| 12. | Align the engine and transaxle mounts as described in ENGINE. With the mounts aligned, and the fasteners properly torqued, adjust clutch pedal freeplay as described in 5.1 Clutch Cable, and adjust the shifting mechanism as described in 4. Shift Mechanism. |
| 13. | Refill the transaxle with the appropriate lubricant before starting or towing the car. See LUBRICATION AND MAINTENANCE for information on the proper lubricant and how to check the level or fill the transaxle. |
|


