5.1 Removing and Installing Transaxle
In the procedure given here, the transaxle assembly is separated from the engine, supported on a floor jack, and taken out from below. Alternately, the engine/transaxle assembly may be removed from above and the transaxle then separated from the engine as described in ENGINE.
The procedure which follows requires a means of externally supporting the weight of the engine, a transmission jack or floor jack with a transmission adaptor, and jack stands designed for the purpose of solidly supporting the raised car. The engine support device is necessary because, in this procedure, all of the engine mounts are removed.
CAUTION-
The car must be raised and supported off its front wheels during the removal procedure. Use extreme caution when working beneath the car.
|
To remove:
| 1. | Disconnect the negative (-) and positive (+) battery cables from the battery, in that order. Disconnect the speedometer cable from the transaxle. |
| 2. | Set the parking brake and loosen the left and right drive axle nuts. Loosen the left and right front wheel lug bolts. |
| 3. | Raise the car and support it on jack stands, and remove both driveshaft nuts, the wheel lug bolts, and the front wheels. For more drive axle and front suspension information, see SUSPENSION AND STEERING. |
CAUTION-
Moving the car even a short distance with the drive axle nuts loosened or removed may cause wheel bearing damage and lead to premature wheel bearing failure.
|
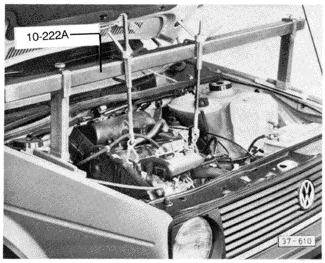
| 4. | Install a device to support the engine. See Fig. 5-1. |
| Fig. 5-1. | Engine support installed. Volkswagen special tool no. 10-222A shown. |
|
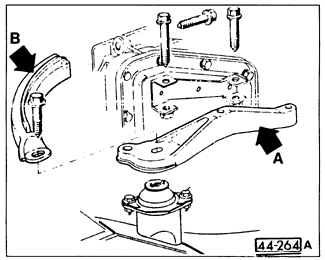
| 5. | Remove the bolts from the rear transaxle mount and remove the mounting arms as shown in Fig. 5-2. |
| 6. | Place a transmission jack or a floor jack with a transmission adaptor beneath the transaxle. Raise the jack just enough to support the transaxle, but do not raise the engine. |
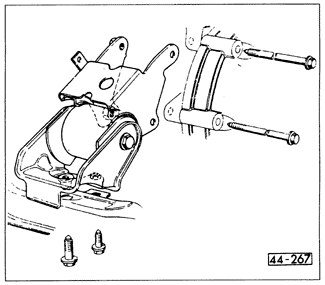
| 7. | Remove the upper bolts from the front engine/transaxle mount as shown in Fig. 5-3. If necessary, also remove the bolt holding the coolant pipe to the mount. Remove the lower bolts from the front mount and remove the mount. |
| 8. | Remove the bolts that hold the transmission protection plate, the torque converter cover plate, and the drive-shaft cover plate to the transaxle, then remove the plates. |
| Fig. 5-2. | Left rear transaxle mounts (arrows). |
|
NOTE-
Early rear mounts are made of die-cast aluminum. The later mount is one-piece (part A in Fig. 5-2 above) and made of steel for additional strength. The later mount can be retrofitted on all models.
|
| Fig. 5-3. | Front engine/transaxle mounting bolts removed from early-type rubber mount. Later hydraulic mount is similar. |
|
NOTE-
The transmission protection plate is at the lower left (driver's side) front of the transaxle; the torque converter cover plate is at the bottom of the bellhousing; the driveshaft cover plate is above the right (passenger) side transaxle drive flange.
|
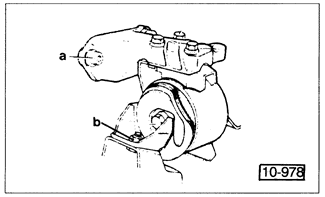
| 10. | Remove the bolts from the right rear engine mount and remove the mount. See Fig. 5-4. |
| Fig. 5-4. | Right rear engine mounting bolts (a and b) removed. |
|
| 11. | Remove the upper transaxle-to-engine mounting bolts. |
| 12. | Remove the starter heat shield and the brackets. Disconnect the starter wiring and then remove the starter mounting bolts and the starter. |
| 13. | Detach the drive axles from the transmission drive flanges. |
| 14. | Separate the left and right lower ball joint from the wheel bearing housing as described in SUSPENSION AND STEERING. Remove the drive axles. |
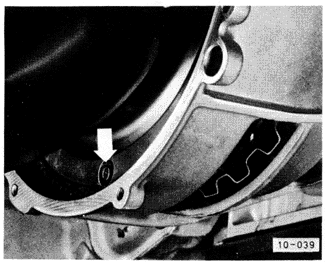
| 15. | Working through the lower opening in the bellhousing, remove the three bolts that hold the torque converter to the drive plate. See Fig. 5-5. |
NOTE-
Use a socket wrench on the crankshaft sprocket bolt and turn the crankshaft clockwise to move the bolts into position for removal.
|
| Fig. 5-5. | Bolt (arrow) fastening torque converter to drive plate. Remove three bolts. |
|
| 16. | Working beneath the car, remove the subframe mounting bolts and allow the subframe to hang freely. |
NOTE-
Alternately, the subframe may be left in and instead the transmission/engine assembly may be pushed towards the front of the car. This can be done by positioning the car tire jack between the axle beam and the engine block.
|
| 17. | Remove the lower engine-to-transaxle mounting bolt. Slide the transaxle off its dowels and lower it out of the car. |
To install:
| 1. | To avoid serious damage when installing the transaxle, make certain the torque converter has not slipped off of its support. Turn the converter back and forth to check that it has engaged its splines. |
| 2. | Position the transaxle until it can pushed onto its locating dowels. Install and evenly tighten all the engine-to-transaxle mounting bolts until the transaxle is firmly in place. Torque the smaller M 10 bolts to 45 Nm (33 ft. lb.) and the larger M 12 bolts to 75 Nm (55 ft. lb.). |
| 3. | Install all of the transaxle and engine mounts and their bolts. Remount the coolant pipe to the front engine/ transaxle mount. Snug the bolts, but do not tighten them. |
| 4. | Install the driveshafts first into the wheel bearing housing and then onto the drive flanges. Install the socket-head inner mounting bolts and torque them to 45 Nm (33 ft. lb.). Align the subframe and install, but do not fully torque, the mounting bolts. Position the lower ball joints into the wheel bearing housing. Install the clamp bolt and torque it to 50 Nm (37 ft. lb.). |
| 5. | Install the mounting bolts which attach the torque converter to the drive plate. Using a wrench on the front crankshaft bolt, turn the crankshaft (clockwise only) to align the bolt holes. Torque the bolts to 35 Nm (26 ft. lb.). |
| 6. | Remove the transmission jack and install the transmission protection plate, the torque converter cover plate, and the driveshaft cover plate, torquing the smaller M 8 bolts to 20 Nm (15 ft. lb.) and the larger M 10 bolts to 25 Nm (18 ft. lb.). |
| 7. | Install the starter with its heat shield and brackets, torquing the bolts to 20 Nm (15 ft. lb.), then reconnect the starter wires. |
| 8. | Install the washers and the drive axle nuts on the ends of the driveshafts until they are snug. Install the road wheels and lower the car to the ground. Torque the wheel lug bolts to 110 Nm (81 ft. lb.) and the drive axle nuts to 265 Nm (195 ft. lb.). Torque the subframe mounting bolts to 130 Nm (96 ft. lb.). |
| 9. | Reconnect the battery cables. Reconnect the speedometer cable and torque it to 10 Nm (87 in. lb.). |
| 10. | Align the engine/transaxle mounts, as described in ENGINE. With the mounts aligned and the nuts and bolts torqued, install and adjust the selector lever cable and the accelerator and throttle cables as described earlier in 4.2 External Transmission Adjustments. |
CAUTION-
If the ATF or the final drive hypoid gear oil have been drained, refill as described in LUBRICATION AND MAINTENANCE before starting the engine or moving the car.
|
|