Removing and Installing Main Shaft and Pinion Shaft
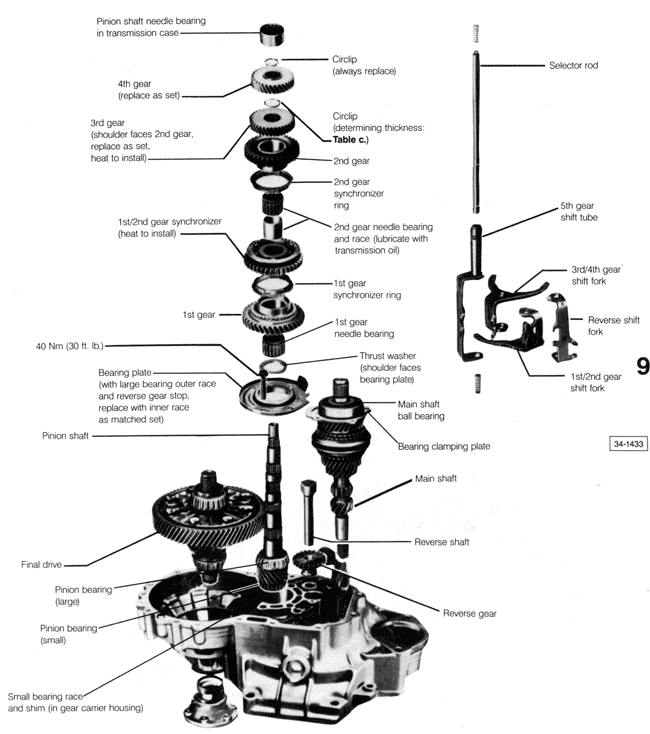
This is a continuation of transmission disassembly. The 5th gear should be removed as described above before beginning this procedure. Fig. 7-10 shows an exploded view of the transmission main shaft and pinion shaft.
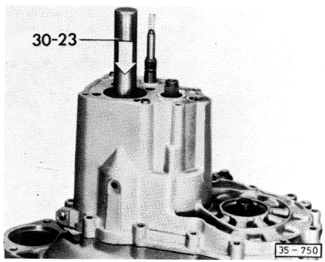
Many of the procedures described here suggest or require the use of special tools. Unless otherwise specified, the numbers which appear in the illustrations identify Volkswagen special tools by their Volkswagen tool numbers.
To remove main shaft and pinion shaft:
| 1. | Remove the bolt that secures the reverse gear shaft. |
| Fig. 7-10. | Exploded view of main shaft and pinion shaft. |
|
| 3. | Using a 12-point M6 socket wrench, remove the four bolts that hold the bearing clamping plate for the main shaft bearing. See Fig. 7-11. |
| Fig. 7-11. | Main shaft bearing clamping plate bolts being removed. |

|
| 4. | Remove the transmission-case-to-gear-carrier bolts and separate the case from the gear carrier housing using a puller as shown in Fig. 7-12. The main shaft ball bearing should remain on the main shaft. If there is a shim atop the ball bearing, save it for reinstallation of the bearing. |
NOTE-
Do not lose the magnet that is held between the transmission case and gear carrier housing.
|
| Fig. 7-12. | Transmission case being separated from gear carrier housing Puller presses against main shaft. |
|
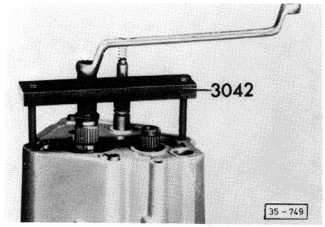
| 5. | Lift the shift fork assembly up so that the selector rod is pulled from the gear carrier housing, and then remove the shift fork assembly. |
| 6. | Remove the 4th gear circlip from the pinion shaft, then remove the main shaft and 4th gear at the same time. |
| 7. | On the pinion shaft, remove the 3rd-gear circlip, and then remove 3rd gear, 2nd gear, the 2nd gear synchronizer, and the 2nd gear needle bearing. Remove reverse gear and the reverse gear shaft. |
| 8. | Using a puller, pull off the 1st/2nd gear synchronizer and 1st gear then remove the 1st gear needle bearing and thrust washer. Unbolt the pinion shaft bearing retaining plate and remove the pinion shaft. |
To install pinion shaft and main shaft:
| 1. | Install the pinion shaft and bearing retaining plate and torque the bearing plate bolts to 40 Nm (30 ft. lb.). |
| 2. | Install the thrust washer, 1st gear needle bearing, 1st gear, and synchronizer ring on pinion shaft. |
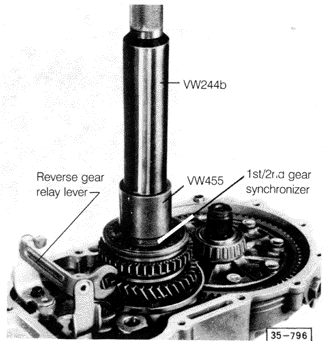
| 3. | Turn the synchronizer ring until the grooves align with the keys, then heat the synchronizer hub to 248°F (120°C) and press it on as shown in Fig. 7-13. |
| Fig. 7-13. | 1st/2nd gear synchronizer being installed. Heat synchronizer to 248°F (120°C) before installing. |
|
| 4. | If the reverse gear relay lever was removed, install it and torque the bolts to 25 Nm (18 ft. lb.). Make sure the plastic insert is installed on the relay lever, then install the reverse gear shaft and reverse gear. |
NOTE-
Beginning with transmission number 13 08 7 (8/13/87 production), a modified reverse gear relay lever is installed. The modified lever has a pressure spring, with a guide piece that fits into a new recess in the gear carrier housing. The relay levers were also modified. The old and new parts are not interchangeable. The newer parts can only be installed in the new style gear carrier housing.
|
| 5. | Press on the 2nd gear needle bearing race, using the tools shown above in Fig. 7-13, then install the 2nd gear synchronizer ring, 2nd gear, and 3rd gear. |
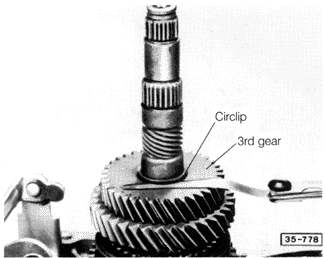
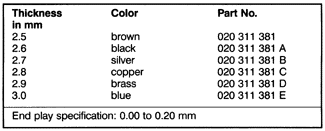
| 6. | Install the 3rd gear circlip and use a feeler gauge to check the end play as shown in Fig. 7-14. Play should be between 0.00 to 0.20 mm, trying to keep as close as possible to the lower limit. If end play is incorrect, it can be adjusted using circlips of differing thickness. Table c lists the circlips that are available. |
| Fig. 7-14. | 3rd gear endplay should be between 0.00 to 0.20 mm. Adjust by using a circlip of different thickness. |
|
NOTE-
Part numbers are for reference only. Always rely on an authorized Volkswagen parts department for the most accurate and up-to-date parts information.
|
Table c. Circlips for Adjusting 3rd Gear End Play
| 7. | If the main shaft has not been disassembled, press the ball bearing off the main shaft. |
| 8. | Install the main shaft, without the ball bearing, into the gear carrier housing, at the same time installing 4th gear on the pinion shaft. Then press on the 4th gear circlip. |
CAUTION- To prevent damage to the gear carrier housing, the main shaft support must be installed as shown earlier in Fig. 7-1 before installing the main shaft.
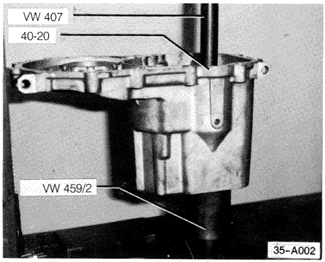
| 9. | Press the main shaft ball bearing into the transmission case as shown in Fig. 7-15. If the ball bearing was installed with a shim, the old shim or one of the same thickness should be used. If the ball bearing had no shim, do not use one. |
NOTE-
The wide shoulder on the ball bearing inner race should face 4th gear.
|
| Fig. 7-15. | Main shaft ball bearing being pressed into transmission case. Use Volkswagen special tool no. VW 459/2 (as shown) to support case. |
|
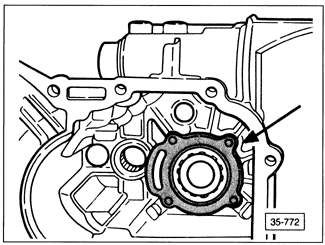
| 10. | Position the bearing clamping plate as shown in Fig. 7-16. Install but do not fully tighten the plate bolts. |
| Fig. 7-16. | Correct installation of main shaft ball bearing clamping plate (arrow). |
|
| 11. | Insert the lower shift fork spring into the gear carrier housing, then install the shift forks. First insert the 1st/ 2nd gear shift fork set into the synchronizer sleeve, then lift the selector rod slightly to swing the fork set around the pinion shaft. Next, guide the 3rd/4th gear fork into the synchronizer sleeve, and the reverse fork into the relay lever. Then slip the selector rod into the gear carrier housing. |
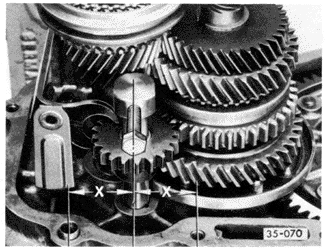
| 12. | Before installing the transmission case, check the alignment of the reverse gear shaft as shown in Fig. 7-17. |
| Fig. 7-17. | Reverse gear shaft alignment. Distance x should be equal on both sides. Reverse gear shaft lock bolt shown temporarily installed to aid alignment. Remove bolt before installing transmission case. |
|
| 13. | Using a new gasket, install the transmission case as shown in Fig. 7-18, then tighten the case bolts to 25 Nm (18 ft. lb.). |
| Fig. 7-18. | Transmission case being installed to gear carrier housing. Use drift on main shaft ball bearing to seat bearing firmly on main shaft. |
|
| 14. | Install and tighten the reverse gear shaft lock bolt to 30 Nm (22 ft. lb.). Tighten the main shaft ball bearing clamping plate to 15 Nm (11 ft. lb.). |
| 15. | Install the drive flange as shown earlier in Fig. 6-6. |
CAUTION-
To prevent damage to the gear carrier housing, the main shaft support must be installed as shown in Fig. 7-1 before installing transmission case.
|
|