Removing and Installing 5th Gear
The 5th gear must be removed for complete disassembly of the transmission. 5th gear and its synchronizer can be replaced without further transmission disassembly.
Many of the procedures described here suggest or require the use of special tools. Unless otherwise specified, the numbers which appear in the illustrations identify Volkswagen special tools by their Volkswagen tool numbers.
To remove 5th gear:
| 1. | Remove the bolts that secure the transmission case cover and remove the cover and clutch release bearing. Remove the clutch pushrod. Check the pinion shaft needle bearing in the transmission case cover. It is held in place by a screw. Replace the bearing if it shows signs of wear or pitting. |
| 2. | Remove the backup/upshift indicator light switch, the selector shaft detent plunger, and the 5th gear lockout. |
| 3. | Remove the selector shaft cover, then set the shift forks in Neutral and remove the selector shaft and spring. |
CAUTION-
If the shift forks cannot be set in neutral, the selector shaft must be driven out. Refer to Fig. 7-3. Replace damaged parts (selector shaft, shift forks) before reassembly.
|
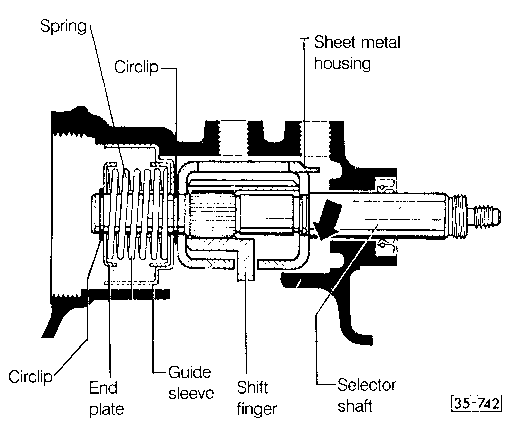
| Fig. 7-3. | Cutaway view of components to be removed if shift forks cannot be set in neutral. Remove circlip, end plate, spring, guide sleeve, circlip. For support, place nut at arrow and drive out selector shaft. Sheet metal housing and shift finger will remain in transmission case. |
|
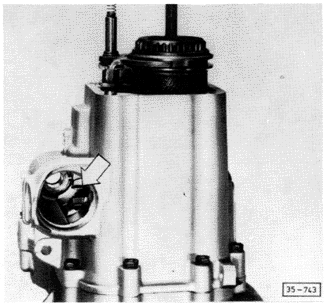
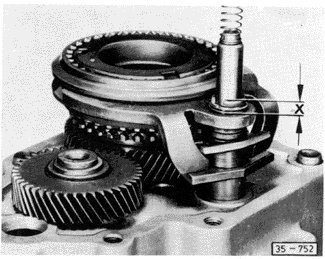
| 4. | Using a 12 mm socket head wrench, remove the bolt that secures the 5th gear synchronizer to the main shaft. It is necessary to engage both 5th and reverse gears, as shown in Fig. 7-4, so that the nut can be removed without the transmission gears turning. |
| Fig. 7-4. | 5th and reverse gears are engaged by pushing down on front shift fork (arrow) so that transmission will be locked to remove synchronizer mounting bolt. |
|
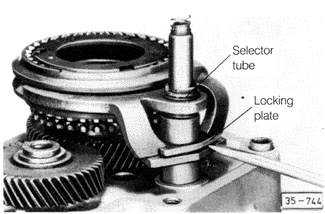
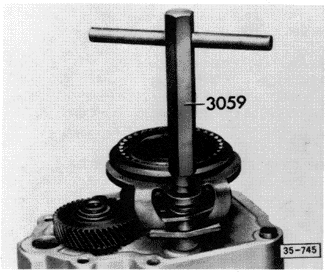
| 5. | Remove the 5th gear synchronizer and shift fork. First remove the selector tube by prying up the locking plate as shown in Fig. 7-5 so that the selector tube can rotate. Then, using the special tool as shown in Fig. 7-6, screw the tube counterclockwise out of the shift fork and remove the 5th gear synchronizer and shift fork together. Check the shift fork for damage and replace if necessary. |
CAUTION-
Do not pull the selector rod out of the tube with the tool. This may dislodge the shift forks, and the transmission will have to be disassembled to reinstall them. If necessary, hold the shift rod down with a screwdriver when taking off the special tool.
|
| Fig. 7-5. | Using screwdriver to pry up locking plate so that selector tube can be removed. |
|
| Fig. 7-6. | Volkswagen special tool no. 3059 being used to remove selector tube. |
|
| 6. | Remove the 5th gear circlip and thrust washer, then use a puller to remove 5th gear from the pinion shaft. |
To install and adjust 5th gear:
| 1. | Heat 5th gear to about 212°F (100°C) and install it on the pinion shaft. The groove on the gear should face upwards. Install the thrust washer and new circlip. |
| 2. | Install the 5th gear synchronizer and shift fork on the main shaft, along with a new locking plate or adjusting sleeve. |
NOTE-
A grooved selector tube uses the adjusting sleeve. A selector tube with a shoulder uses a locking plate.
|
| 3. | Using Volkswagen special tool no. 3059 as shown above in Fig. 7-6, turn the selector tube clockwise to install it. Then adjust the tube by screwing it out until it projects 5.0 mm (.20 in.), as shown in Fig. 7-7. |
CAUTION-
Do not pull the selector rod out of the tube with the tool. This may dislodge the shift forks, and the transmission will have to be disassembled to reinstall them. If necessary, hold the shift rod down with a screwdriver when taking off the special tool.
|
| Fig. 7-7. | Selector tube adjustment. Distance x is 5.0 mm (20 in.). |
|
| 4. | Coat a new synchronizer mounting bolt with thread locking compound and tighten it to 150 Nm (111 ft. lb.). Make sure the 5th and reverse gears are engaged as shown earlier in Fig. 7-4 to prevent the main shaft from rotating. |
| 5. | Place the shift forks in Neutral, then install the selector shaft spring and its cover as shown earlier in Fig. 6-9. Reinstall and adjust the selector shaft detent plunger and the 5th gear lockout as described in 6.1 External Adjustments. |
| 6. | Adjust the 5th gear shift fork by first putting the transmission in 5th gear. To do this, install the shift lever on the selector shaft, and then pull the lever out fully and turn it to the left. |
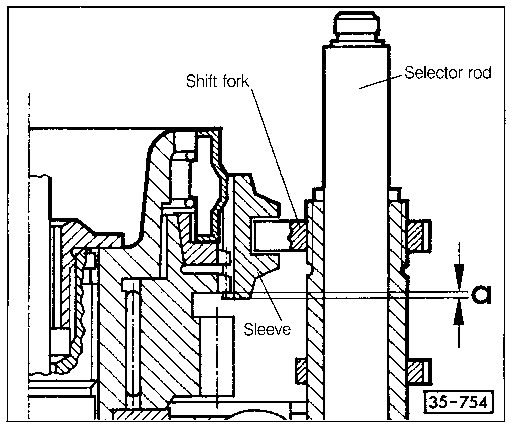
| 7. | Lightly lift the shift fork to eliminate any play, then check the engagement of the synchronizer sleeve with the 5th gear teeth as shown in Fig. 7-8. The overlap should be 1.0 mm (.039 in.). If the overlap is incorrect, adjust it by turning the selector tube. |
| Fig. 7-8. | Engagement of synchronizer sleeve with 5th gear, showing overlap to be measured (a). |
|
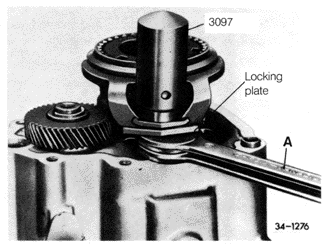
| 8. | Lock the selector tube in position by securing the locking plate as shown in Fig. 7-9. Support the shift fork with a tool at least 12 mm (.5 in.) thick, then press the locking plate down using Volkswagen special tool no. 3097. |
CAUTION-
Protect the sealing surface of the transmission case from damage.
|
| Fig. 7-9. | Shift fork being supported with wrenches (A) so that locking plate can be locked using Volkswagen special tool no. 3097. |
|
| 9. | Reinstall the clutch pushrod and release bearing, and the light switch. Using a new gasket, install the transmission case cover and torque the bolts to 25 Nm (18 ft. lb.). |
|