Removing and Installing Rear Brake Pads (late 1988 and later models)
This procedure covers removing and installing rear disc brake pads for 1988 and later models from VIN -J-462562, and all ABS-equipped cars. For information on finding the VIN for a particular car, see FUNDAMENTALS.
Although the calipers must be removed to change the brake pads, this can be done without disconnecting the flexible brake hose. Keeping the hydraulic system sealed eliminates the need to bleed the brakes afterward.
Brake pads and the surfaces of the rotors wear slightly differently. Always replace brake pads in complete sets. If old pads are to be reinstalled, following an inspection for example, always make sure they are refitted in their original locations.
When replacing the brake pads, the four self-locking caliper mounting bolts should always be replaced.
To remove:
| 1. | Raise the rear of the car and support it securely on jack stands. Remove the rear wheels. Release the parking brake. |
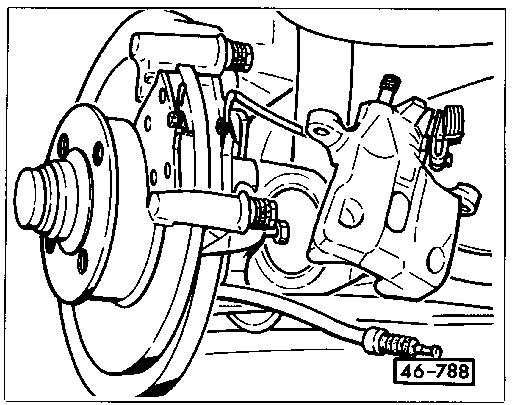
| 2. | Remove the wire clip that secures the parking brake cable to the brake caliper, and disconnect the cable from the actuating lever. See Fig. 7-5. |
| Fig. 7-5. | Late-type rear disc brake, showing location and attachment of parking brake cable. |

|
| 3. | Remove the self-locking bolts which mount the caliper to the pad carrier guide pins, and remove the caliper as shown in Fig. 7-6. Hold each guide pin with an open-end wrench while removing the bolts. |
CAUTION-
Do not allow the caliper to hang by the flexible brake hose. Rest the caliper on the pad carrier, or suspend it using a stiff wire.
|
NOTE-
If the guide pins or their protective boots are damaged in any way, they should be replaced in pairs, and installed with the lubricant which is included with the new parts.
|
| 4. | Lift the brake pads from the pad carrier. |
| Fig. 7-6. | Brake caliper disconnected from pad carrier guide pins by removing self-locking caliper mounting bolts. |

|
CAUTION-
Do not interchange used pads. If the pads are to be reused, mark them for reinstallation in their same positions.
|
To install:
| 1. | Place the brake pads in position on the brake pad carrier. |
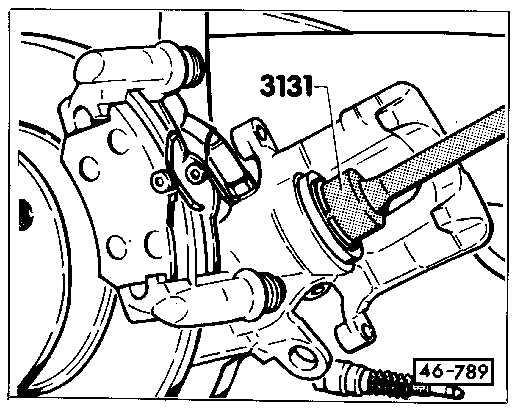
| 2. | When installing new brake pads, adjust the position of the caliper piston to provide clearance for the new, thicker brake pads. Use a hex wrench in the piston socket to turn the caliper piston clockwise all the way into the caliper housing, as shown in Fig. 7-7. The caliper will self-adjust once it is reassembled and the brakes are activated. |
CAUTION-
Adjusting the position of the caliper piston with the piston return mechanism or activating the brake before the caliper is installed will impair the automatic readjustment of the brake caliper.
|
| Fig. 7-7. | Rear caliper piston being turned into caliper with hex wrench (Volkswagen special tool no. 3131 shown). |

|
NOTE-
Turning in the caliper pistons to gain clearance for the new brake pads will cause brake fluid to overflow the master cylinder fluid reservoir. To prevent this, use a clean syringe to first remove some fluid from the reservoir.
|
| 3. | Reinstall the caliper using new self-locking mounting bolts. Hold each guide pin with an open-end wrench, and torque the self-locking bolts to 35 Nm (26 ft. lb.). |
| 4. | Reconnect the parking brake cable. |
| 6. | Mount the wheel and install the lug bolts until they are finger tight, then lower the car and torque the bolts to 110 Nm (81 ft. lb.). |
| 7. | Repeat the procedure on the other side of the car. |
| 8. | Before running the engine or moving the car, pump the brake pedal several times to reset the automatic adjustment of the rear calipers. |
CAUTION-
Running the engine and providing vacuum boost to the brakes while resetting the automatic adjustment may jam the caliper.
|
| 9. | Check the level of brake fluid in the reservoir. If necessary, add new brake fluid to fill the reservoir to the MAX mark. |
WARNING-
New brake pads require some brake-in. Allow for slightly longer stopping distances for the first 100 to 150 miles of city driving, and avoid hard stops.
|
|


