Removing and Installing Brake Shoes
The brake shoes only need to be removed when they are being replaced. If the backing plate must be removed for other repairs, the brake shoes can remain attached to it. Bleeding the brake system will not be necessary as long as the brake lines or hoses are not disconnected. The brake drums can be removed with or without the wheel in place.
To remove:
| 1. | Raise the rear of the car and support it securely on jack stands. Remove the wheels, or simply remove one of the wheel lug bolts from each side. |
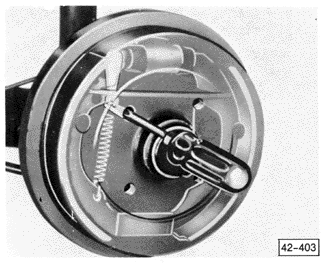
| 2. | With the parking brake released, rotate the brake drum until the adjusting wedge can be seen through a wheel bolt hole. Using a screwdriver as shown in Fig. 6-2, push the adjusting wedge up as far as possible. |
| Fig. 6-2. | Phantom view of rear drum brake showing adjusting wedge being pushed up with screwdriver to back off adjustment. |
|
| 3. | Pry off the wheel bearing grease cap and remove the cotter pin, the nut lock, and the axle nut. Tugging on the brake drum slightly if necessary, remove the thrust washer and the outer wheel bearing. Remove the wheel and the brake drum. |
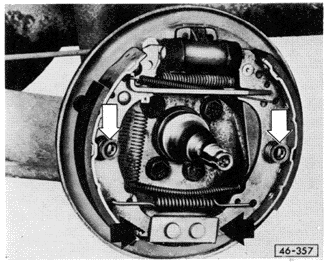
| 4. | While supporting the head of one shoe retaining pin from behind the backing plate, push the spring retainer in and rotate it 90° to remove it. See Fig. 6-3. Repeat the step for the other retainer. |
| Fig. 6-3. | Rear brake assembly showing brake shoe retaining pins and spring retainers (light arrows), and lower brake shoe support (dark arrows). |
|
| 5. | Disengage the brake shoes from the lower brake shoe support at the bottom of the backing plate, and remove the lower return spring. |
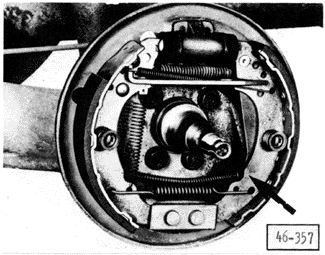
| 6. | Unhook the parking brake cable from the lever that is attached to the rear brake shoe. See Fig. 6-4. |
| Fig. 6-4. | Parking brake cable attachment to lever on rear brake shoe (arrow). |
|
| 7. | Unhook the spring from the bottom of the adjusting wedge, and remove the upper return spring. Remove the brake shoes. |
CAUTION-
Used brake shoes should not be interchanged. If the shoes are to be reused, mark each shoe's position for reinstallation.
|
| 8. | Clamp the adjusting bar in a vise, and use pliers to remove the tensioning spring. |
To install:
| 1. | Clamp the front brake shoe in a vise. Lubricate the points where the brake shoe, the adjusting bar, the tensioning spring, and the adjusting wedge contact each other. Use Wolfracote grease, Volkswagen part no. G 000 650. |
| 2. | Install the adjusting bar and the tensioning spring as shown in Fig. 6-5, then install the adjusting wedge. The lug on the adjusting wedge should face the backing plate. |
| Fig. 6-5. | Adjusting bar and tensioning spring being installed on brake shoe. Brake shoe and spring attachment are shown from behind. |

|
| 3. | Attach the rear brake shoe (with parking brake lever) as shown in Fig. 6-6, then install the upper return spring. |
| Fig. 6-6. | Rear brake shoe with parking brake lever being attached to front shoe and adjusting bar. |
|
| 4. | Holding the brake shoes near the backing plate, attach the parking brake cable. |
| 5. | Using a small amount of Wolfracote grease, lubricate the points on the backing plate where the edges of the brake shoes make contact. |
WARNING-
Do not allow grease to contaminate the brake linings.
|
| 6. | Place the upper ends of the brake shoes around the wheel cylinder piston, install the lower return spring, and engage the bottom ends of the shoes on the lower support. |
| 7. | Install the shoe retaining pins, the springs, and the spring retainers. Turn the retainers 90° to lock them in place. |
| 8. | Reinstall the adjusting wedge spring, then push the wedge up to fully retract the brake shoes for installing the drum. |
| 9. | Install the brake drum and repack and adjust the wheel bearings as described in SUSPENSION AND STEERING. Use a new cotter pin to secure the axle nut lock. |
| 10. | If the wheel was removed from the brake drum, mount the wheel and install the wheel lug bolts. Lower the car and then torque the lug bolts to 110 Nm (81 ft. lb.). |
| 11. | After completing the installation on both rear brakes, firmly apply the brake pedal once to set the self-adjusting wedge. |
WARNING-
New brake linings require some break-in. Allow for slightly longer stopping distances for the first 100 to 150 miles of city driving, and avoid hard stops.
|
|