Previous, Next, Contents, Home.

4.1 Changing Engine Oil and Filter

The 7,500-mile or 6 month oil change interval specified in the maintenance schedule should be the basic guide to scheduling oil changes. Do not rely on the color of the oil on the dipstick to indicate when a change is needed. Because of the detergent additives in the oil, fresh oil will look dark after only a few hundred miles.

If the car is used primarily for short trips, or routinely operated in dusty conditions or slow-moving traffic, the oil should be changed more frequently. In general, changing the oil at more frequent intervals will help better protect the engine, and promote longer engine life. For diesel engines using SAE 10W-40 oil in winter, the oil should be changed every 3,000 miles (4800 km).

Although it is an acceptable practice to change the oil filter at every other oil change, reusing the old filter leaves about 1/2 quart of old oil in the lubrication system. The publisher recommends also changing the oil filter with every oil change, no matter what the interval.

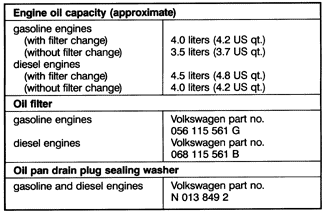
A complete oil change requires approximately 5 US qt. of new oil (see 3. Fluid and Lubricant Specifications), a new oil filter, and a new drain plug sealing washer. Part numbers and oil capacities are given in Table g. The equipment needed, a drain plug socket or box wrench (19 mm), a drain pan of at least 6 US qt. (5.6 l) capacity, and an oil filter wrench, is described in FUNDAMENTALS.

Table g. Engine Oil Change Specifications

To change oil and filter:
1. Run the car for a few minutes to slightly warm the engine and the oil, then shut the engine off.
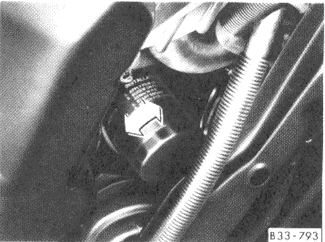
2. With the car on level ground, place a drain pan under the oil drain plug shown in Fig. 4-3.

Fig. 4-3. Engine oil drain plug (arrow) in oil pan underneath engine (shown from rear).

NOTE-

If a shallow enough drain pan is used, the car will not need to be raised off the ground.

3. Using a 19 mm socket or box wrench, loosen the drain plug. By hand, remove the plug and let the oil drain into the pan.

CAUTION-

Pull the loose plug away from the hole quickly to avoid being burned by the hot oil. It will run out quickly when the plug is removed.

4. When the oil flow has diminished to an occasional drip, reinstall the drain plug with a new metal sealing washer and torque the plug to 30 Nm (22 ft. lb.).
5. Move the drain pan slightly forward so that it is directly under the oil filter, shown in Fig. 4-4. Using an oil filter wrench, loosen the filter by turning it counterclockwise (as viewed from below), then remove it by hand.

Fig. 4-4. Engine oil filter located in front of engine, behind radiator. (Shown viewed from below).

6. After the oil stops dripping, wipe clean the oil filter gasket surface on the filter mounting flange. Lubricate the rubber gasket of the new oil filter with a light coating of clean engine oil.
7. Install the filter by hand until the gasket contacts the mounting flange, then turn the filter another 3/4 turn to tighten it.

CAUTION-

Overtightening the oil filter will make the next change much more difficult, and may deform the gasket, causing leaks.

8. Refill the crankcase with oil. Approximate oil capacity is given in Table g. above. Use the dipstick to check for the correct oil level. Oil specifications are found in 3. Fluid and Lubricant Specifications.
9. Start the engine and allow it to run for three to five minutes to circulate the new oil, then check for leaks at the drain plug and around the oil filter. Stop the engine and recheck the oil level.

NOTE-

Dispose of the used oil properly. Use tight-sealing containers and mark them clearly. Check with a local service station or oil retailer about proper disposal.

Previous, Next, Contents, Home.