Removing and Installing Shift Lever and Shift Rod
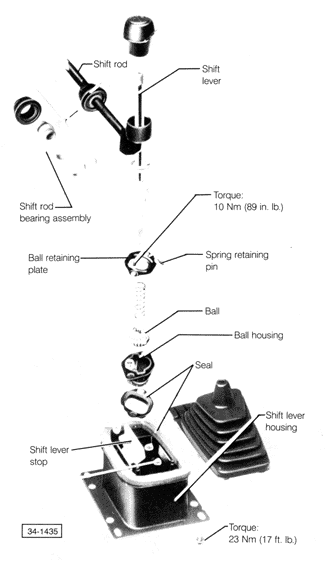
| Fig. 4-6. | Exploded view of gearshift lever and related parts. |
|
Fig. 4-6 is an exploded view of the shift lever and related parts. Removal is necessary to replace the bearing assembly or the ball if either is determined to be cracked or worn. The exhaust pipe will need to be removed. See EXHAUST SYSTEM and note the special tool requirements. After installing the shift lever and shift rod, the mechanism should be adjusted using the special Volkswagen gauge as described above.
To remove and install shift lever and shift rod:
| 1. | Unscrew the shift knob. Remove the boot by detaching it at the bottom and pulling if off over the gearshift lever. |
| 3. | Remove the exhaust pipe from the exhaust manifold as described in EXHAUST SYSTEM . Remove the exhaust heat shield. |
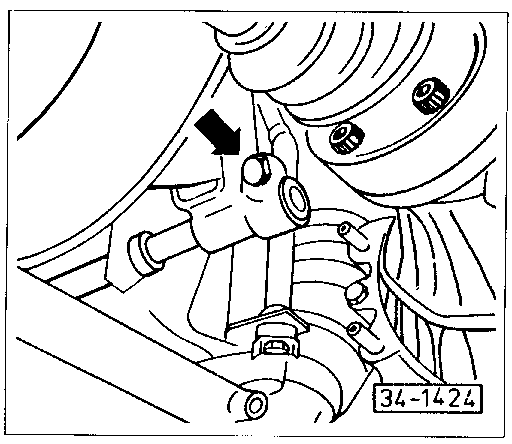
| 4. | Loosen the shift rod clamp bolt (see Fig. 4-3 ) and remove the bolts holding the relay shaft bracket to the body. Slide the bracket off the shift rod. |
| Fig. 4-3. | Shift rod clamp bolt (arrow). |
|
| 5. | Working beneath the car, remove the bolts holding the shift lever housing to the body. |
| 6. | Working inside the passenger compartment, remove the two nuts holding the ball retaining plate to the housing. Push the rear shift rod bearing into the shift housing, and pull out the shift lever with the shift rod. |
| 7. | Installation is the reverse of removal. Remove any old grease from the joints and pivot points and lubricate them with molybdenum disulphide grease (Volkswagen part no. G 000 602). |
|