Removing and Installing Steering Gearbox
No special tools are required for removing and installing the steering gearbox, although removing and installing the power-assisted steering gearbox requires supporting the engine and transaxle from above and loosening or removing some engine and transaxle mounts.
It is not necessary to remove the steering gearbox to replace the mounting bushings. The bushings are split at the bottom and the clamps can be removed from above.
On cars with power-assisted steering, a May 1985 production change resulted in a larger universal joint clamping bolt at the connection to the steering gear. Only the later parts are available. Fitting a new universal joint shaft to an early 1985 car may require that the pinion shaft notch for the universal joint clamp bolt be made larger by approximately 1 mm (.04 in.).
To remove:
| 3. | On cars with manual transmission, remove the gear-shift relay shaft bracket from the steering gear housing. See MANUAL TRANSMISSION. |
| 4. | On cars with power-assisted steering, clean the pressure hose and return hose unions at the steering gearbox and remove them. Do not bend the rigid tubing. Seal hydraulic ports with plug (Volkswagen part no. 113 301 229 A) and banjo bolt (Volkswagen part no. N 904 674 01). |
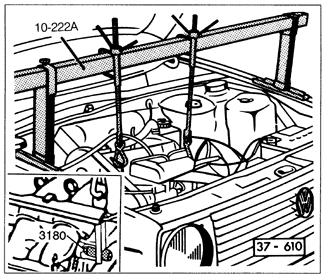
| 5. | On cars with power-assisted steering, support the engine and transaxle as shown in Fig. 7-14, remove the rear transaxle mount, and loosen the center bolt of the rear engine mount. |
| Fig. 7-14. | Volkswagen special tool no. 10-222A used to safely support engine and transaxle. Inset shows special tool 3180 for use on 16-valve models. |
|
| 6. | Remove the boot from the steering pinion housing to expose the universal joint shaft. Remove the clamp bolt and nut from the lower end of the shaft and remove the universal joint. |
| 7. | Remove the U-shaped steering gear housing mounting clamps (one right-side clamp and the left-side housing mounting on power-assisted steering cars), free the steering gear housing from the mounting studs on the subframe, and remove the steering gear housing from beneath the car. |
Installation is the reverse of removal. If the rubber mounting bushings are hard and cracked or oil-soaked, they should be replaced before installation of the steering gear. Make sure that the universal joint shaft lines up with the splined shaft on the steering gearbox as it is being installed. On cars with manual steering, center the steering rack as described in Centering Manual Steering Rack. Torque the mounting nuts to 30 Nm (22 ft. lb.).
Torque the universal joint clamping bolt to 30 Nm (22 ft. lb.). Torque the power steering line unions to 20 Nm (15 ft. lb.). Install the relay shaft bracket and check the gearshift linkage as described in
MANUAL TRANSMISSION. Fill the power steering system with new fluid as described in 7.3 Power-assisted Steering. Torque the outer tie rod end nuts to 35 Nm (26 ft. lb.). When the installation is complete, a check of front wheel toe as described in 4. Wheels, Tires, and Alignment is highly recommended, particularly if the steering gear and tie rods have been disassembled.