Removing and Installing Rear Suspension as a Unit
The car must be raised high enough to remove the axle assembly, so a lift or a jack and suitable jack stands are required. Removal of the axle assembly also requires disconnecting brake lines to the rear wheels, and bleeding the brakes when reinstallation is complete.
To remove:
| 1. | Disconnect the parking brake cables at the parking brake lever between the front seats. See BRAKES. |
NOTE-
If the car can be raised and safely supported high enough, the shock absorber and spring units can stay attached to the axle beam at the bottom and be removed with the axle beam.
|
| 3. | Disconnect the flexible rear brake hoses from the rigid brake lines near the forward edge of the axle beam. Cap both ends of the open connection to prevent contamination. |
| 4. | On GTI and all Jetta models, disconnect the brake pressure regulator spring from the bracket attached to the axle beam. See BRAKES. |
| 5. | While supporting the front of the axle beam so that it cannot fall, loosen and remove the bolts which hold the axle beam mounting brackets to the car body. |
| 6. | Remove the rear suspension assembly by pulling it out to the rear. |
To install:
| 1. | If the axle beam mounting brackets have been removed from the axle beam, or if the pivot bolts have been loosened, align the mounting brackets at 12°±2° as shown in Fig. 6-7, then torque the pivot bolts and their nuts to 60 Nm (44 ft. lb.). |
| Fig. 6-7. | Axle beam mounting brackets being aligned at 12°±2° angle to axle beam prior to axle beam installation. Protractor shown is Volkswagen special tool no. 3021. |

|
| 2. | Position the rear suspension assembly under the car and loosely install the mounting bolts. Position the right (passenger-side) mounting bracket so that the bolts are centered in the elongated holes, and torque them to 85 Nm (63 ft. lb.). |
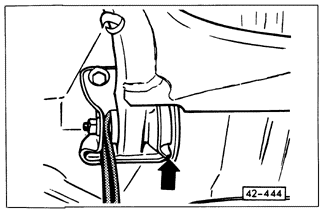
| 3. | Using two prybars, push the left (driver's-side) mounting bracket to the left, leaving only a slight gap between the inside of the bushing and the mounting bracket, as shown in Fig. 6-8. Torque the mounting bracket bolts to 85 Nm (63 ft. lb.). |
| Fig. 6-8. | Positioning left axle beam mounting bracket with prybars. Move bracket to left, leaving slight gap (arrow). |
|
| 4. | Clean the brake line unions and reconnect the flexible brake hoses to the rigid brake lines. Torque the unions to 15 to 20 Nm (11 to 15 ft. lb.). |
| 5. | Remount the rear shock absorbers and springs. Carefully lower the car while guiding the top shock absorber mounts into their mounting holes. |
| 7. | Reconnect the parking brake cables. |
| 8. | Bleed the brakes and adjust the parking brake as described in BRAKES. |
|