4.7 Valve Stem Oil Seals
The sign of faulty valve stem oil seals are excessive oil consumption and blue-gray oil smoke from the exhaust after starting and during sudden deceleration. For more information on excessive oil consumption and smoking, see 3. Troubleshooting.
Replacement of the valve stem oil seals requires that the camshaft(s), the cam followers, and the valve springs be removed. Valve springs can be removed while the cylinder head is installed with the use of compressed air to hold the valves closed, or with the cylinder head removed. Either method requires the use of a valve spring compressor. An additional special tool is highly recommended for installation of the new seals. If the special tools are not available, an alternative is to remove and partially dismantle the cylinder head, following the procedures in this section, and have the valve spring and valve stem oil seal work performed by an authorized Volkswagen dealer or other qualified repair shop.
NOTE-
Diesel engines do not require compressed air to hold the valve on its seat. The valve can rest on the piston at Top Dead Center (TDC).
|
To replace valve stem oil seals:
| 2. | Remove the camshaft, as described in 4.5 Removing and Installing Camshaft, and remove the cam followers. Keep all parts so that they can be reinstalled in their original locations. |
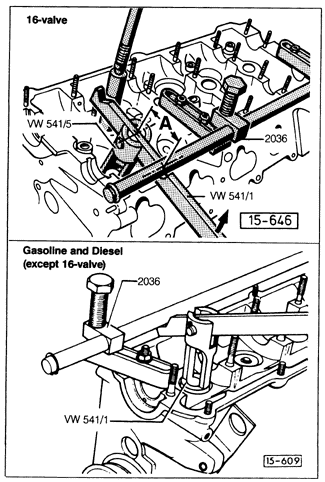
| 3. | Remove the valve springs as shown in Fig. 4-17. The valve spring compressors shown are Volkswagen special tools, designed specifically for use on Volkswagen engines. |
NOTE-
To support the valves with compressed air and remove the valve springs with the cylinder head installed, install an air hose adapter in the spark plug hole. Position the piston for the cylinder at top dead center (TDC). Apply a constant air pressure of at least 6.0 bar (85 psi).
|
| 4. | Remove the valve stem oil seals. Volkswagen recommends the use of a slide hammer, special tool no. 3047A, to remove the seals without damage to the valve stems. |
| 5. | Install each new valve stem oil seal by temporarily fitting the protective plastic cap over the valve stem end, and then hand-pressing the seal onto the valve stem as shown in Fig. 4-18. Remove the protective cap for use on the next valve. |
NOTE-
The protective cap protects the seal from being damaged by the keeper grooves in the valve stem. In the absence of a protective cap, temporarily wrap the valve stem with plastic tape.
|
NOTE-
The use of an inexpensive hand-held tool will guard against damaging the new seals on installation. Such a tool is Volkswagen special tool no. US 5042 (order no. TU5 042 000 15 ZEL).
|
| Fig. 4-17. | Valve spring compressors being used to remove valve springs on 16-valve engine (top), and all other gasoline and diesel engines (bottom). On 16-valve engines, it may be necessary to notch the tool's handle as shown to prevent it from slipping. Dimension a is 50.0 mm (1.97 in.). Numbers identify Volkswagen special tools. |

|
| Fig. 4-18. | Protective cap A, new valve stem oil seal B, and installing tool. |

|
| 6. | Reinstall the valve springs. The closely spaced coils of the outer valve springs face down, toward the lower spring seats. |
|

