4.5 Removing and Installing Camshaft
The camshaft can be removed without removing the cylinder head. Removing the camshaft allows access to the cam followers, the valve springs, and the valve stem oil seals. When removed, the camshaft should be checked for wear and other visible damage as described in 4.9 Disassembly, Assembly, and Reconditioning.
To remove and install camshaft (except 16-valve engines):
| 3. | On gasoline engines, remove bearing caps 1 and 3, in that order. Loosen the nuts on each of the two remaining caps, a little at a time so that valve spring tension is relieved evenly. |
| 4. | On diesel engines, remove bearing caps 1, 3 and 5, in that order. Loosen the nuts on each of the two remaining caps, a little at a time so that valve spring tension is relieved evenly. |
CAUTION-
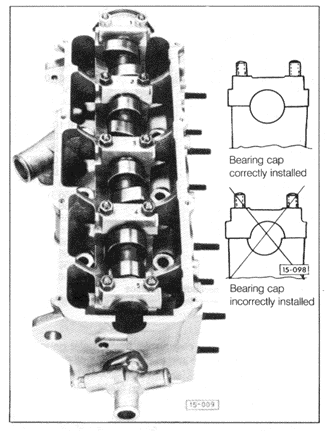
To avoid uneven and accelerated wear, the bearing caps must be reinstalled in their exact original positions. Although each bearing cap is numbered, the numbers are not always marked in the same place on the cap.
|
| 5. | To install, begin with bearing caps 2 and 5 on gasoline engines, or 2 and 4 on diesel engines. See Fig. 4-12. Install the washers and nuts, gradually tightening all four nuts until the camshaft is drawn down fully and evenly into the bearing saddles. Install the remaining bearing caps with washers and nuts. Torque all the nuts to 20 Nm (15 ft. lb.). |
| Fig. 4-12. | Camshaft bearing caps. Diesel engine shown. Gasoline engines are similar, except that bearing cap no. 4 is not used. |
|
To remove and install camshafts (16-valve engines):
| 3. | Remove the ignition distributor from the rear of the cylinder head as described in IGNITION. |
| 4. | Remove bearing caps 5 and 7 from the intake camshaft, then remove the end cap near the cam chain sprocket. Remove bearing caps 1 and 3 from the exhaust camshaft, then remove the two end caps. See Fig. 4-13. |
| 5. | Gradually and evenly loosen each of the eight nuts from bearing caps 2, 4, 6 and 8, a little at a time so that valve spring tension and cam chain tension are relieved evenly. |
CAUTION-
Removal of camshaft bearing caps by any other method may damage the camshafts, the camshaft chain, or the bearing caps.
|
| Fig. 4-13. | Top view of 16-valve cylinder head showing camshaft bearing cap identification. Inset shows proper installation of bearing caps (beveled corners facing intake side). |

|
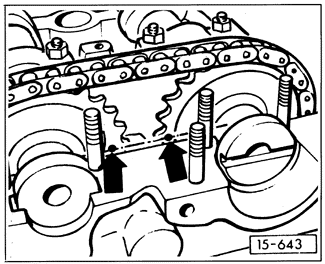
| 6. | Installation is the reverse of removal. Install the camshafts and the drive chain so that the markings on the chain sprockets face each other and align with the top of the cylinder head, as shown in Fig. 4-14. |
| Fig. 4-14. | Camshaft drive chain sprockets correctly aligned in 16-valve cylinder head. |
|
| 9. | Install the ignition distributor and adjust ignition timing as described in IGNITION. |
|