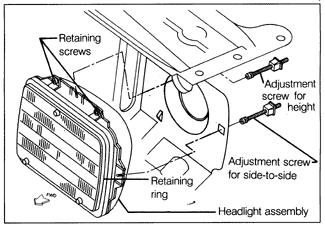
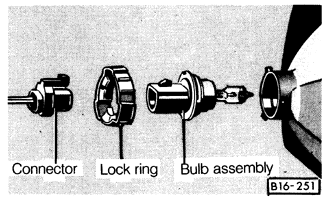
6.1 HeadlightsThe majority of the cars covered by this manual have aerodynamic headlights with a one-piece lens and reflector assembly and a replaceable halogen bulb. See Fig. 6-1. A lock ring holds the bulb in place, and two screws are used to aim the headlights. Some 1985 and 1986 Golf models have sealed-beam halogen headlights. Headlight aim is also by two screws, but the bulb and lens must be replaced as one assembly. See Fig. 6-2. Replace the bulb on aerodynamic headlights with the lights turned off. Open the hood and remove the headlight electrical connector. See Fig. 6-3. Twist the lock ring counterclockwise to release the bulb. The recesses on the new bulb assembly should engage the locating lugs on the lens and reflector housing. Do not touch the bulb glass. Dirt and oil deposits on the glass can cause hot spots and rapid bulb failure. Twist the lock ring clockwise to firmly seat it. Check headlight aim as described in Aiming Headlights.


To replace the lens and reflector on aerodynamic headlights, first remove the bulb as described above. Remove the grille as described in 6.4 Trim, Bumpers, and Body. Working from the front of the headlight, remove the four screws that hold the headlight mounting frame to the body and remove the frame and lens and reflector. Unclip the old lens and reflector from the adjustment screws. Clip on the new lens and reflector, and reinstall the mounting frame, grille, and bulb. Check headlight aim as described in Aiming Headlights. Replace a sealed beam headlight with the lights off. Remove the grille as described in 6.4 Trim, Bumpers, and Body. Remove the four retaining screws from the retaining ring and remove the ring. Pull the headlight forward and disconnect the wiring. Make sure that the side of the new lens marked UP or TOP, or that the single adjusting lug is uppermost. It should not be necessary to aim the headlight if the adjustment screws have not been touched, however, it is a good idea to check headlight aim as described in Aiming Headlights |