Drive Flange Oil Seals
The drive flange oil seals can be replaced without removing the transaxle from the car. Check the new seals before beginning the job to make sure that each is equipped with a tension spring behind the seal lip.
To replace:
| 1. | Remove the socket-head bolts to separate the front drive axle and constant velocity joint from the transaxle drive flange. Suspend the detached end of the drive axle with a stiff wire hook to avoid outer constant velocity joint damage. |
CAUTION-
Do not let the driveshaft hang freely. This may damage the outer constant velocity joints, causing them to fail soon after the vehicle is returned to service.
|
NOTE-
It may be necessary or at least helpful to separate the ball joint from the lower control arm to allow moving the drive axle farther out of the way. For additional information, see SUSPENSION AND STEERING.
|
| 2. | Pry the dust cap from the center of the drive flange. Remove the circlip which retains the flange, and remove the spring washer. Using a puller such as that shown in Fig. 5-11, pull the drive flange from the drive flange shaft. |
NOTE-
Notice the way that the spring washer is installed so that it can be reinstalled the same way.
|
| 3. | Pry the oil seal from its recess using a hooked tool or a screwdriver, using care not to damage the sealing surface. |
| 4. | Pack the open side of the new seal with multipurpose grease, and then drive the seal into place, as shown in Fig. 5-12, until it is fully seated. |
| 5. | Inspect the drive flange for wear at the point where it is contacted by the oil seal. Replace the drive flange if the seal contact area is grooved. |
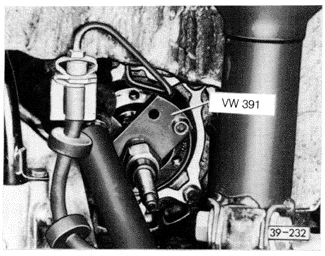
| Fig. 5-11. | Drive flange being pulled from drive flange shaft. Volkswagen special tool no. VW 391 shown. If another puller is used, be careful not to damage threaded hole in drive flange shaft. |
|
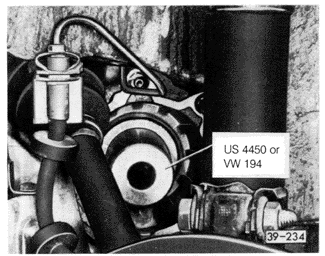
| Fig. 5-12. | Seal driver (Volkswagen special tool no. US 4450 or VW 194) being used to install new drive flange oil seal. Alternately, use tool of approximate seal diameter to apply even installation pressure. |
|
| 6. | Install the drive flange as shown in Fig. 5-13. |
| 7. | Install the spring washer. Fit a new circlip over the end of the drive flange shaft. |
| 8. | Lightly drive the circlip into place until it is firmly seated in its groove in the drive flange shaft. |
| 9. | Reattach the drive axle to the drive flange. Torque the socket-head bolts to 45 Nm (33 ft. lb.). |
| 10. | If the ball joint was disconnected, raise the lower suspension control arm and insert the ball joint stud into the bearing housing. Install the clamp bolt and nut, and torque to 50 Nm (37 ft. lb.). |
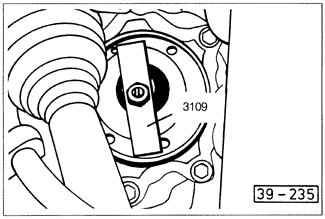
| Fig. 5-13. | Drive flange being installed. Volkswagen special tool no. 3109 (shown) threads into center of drive flange shaft. Nut is tightened to pull flange into place evenly and avoid seal damage. |
|
|