Removing, Reconditioning, and Installing Brake RotorsTo remove the brake rotors, first remove the caliper and brake pads as described above. Remove the countersunk flat-head screw between two of the wheel bolt holes, and pull the rotor off the wheel hub. Use a rust-penetrating oil or very gently tap with a soft-faced mallet to free a rotor which is stuck to the hub by corrosion.
Installation is the reverse of removal. Make sure that the rotor and wheel hub mounting surfaces mate properly and are free of dirt and corrosion.
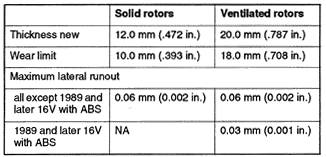
Brake rotors should always be resurfaced in pairs, with an equal amount of material removed from both sides of each rotor. Brake rotors can be resurfaced by most local automotive machine shops. Table d lists dimensions, wear limits, and runout specifications for solid and ventilated rotors. Rotors which are worn beyond the wear limit are too thin to be used safely, and should be replaced. Rotors which are warped in excess of the runout specification or cracked should always be replaced. Rotors should always be replaced in pairs. Resurfaced rotors should still be at least 0.5 mm (.020 in.) thicker than the wear limit, to allow for additional wear. If not, they too should be replaced. Table d. Front Rotor Reconditioning Specifications
|
