Removing and Installing Brake Pads (1989 and later 16V models only)
The brake pads can be changed without disconnecting the flexible brake hose. Keeping the hydraulic part of the brake system sealed while changing pads eliminates the need to bleed the brakes afterward.
The bolts which attach the caliper to the guide bushings on the pad carrier are self-locking bolts designed to be used one time only. When removing these bolts to replace brake pads, they must also be replaced. Also, the rubber dust boots which protect the guide bushings should be inspected. Worn or damaged boots should be replaced. A repair kit is available which includes a lubricant for the guide pins and bushings.
Brake pads and the surfaces of the rotors wear slightly differently. Always replace brake pads in complete sets. If old pads are to be reinstalled, such as after inspecting them, always make sure that each is refitted in its original location.
To remove:
| 1. | Raise the front of the car and support it securely on jack stands. Remove the front wheels. |
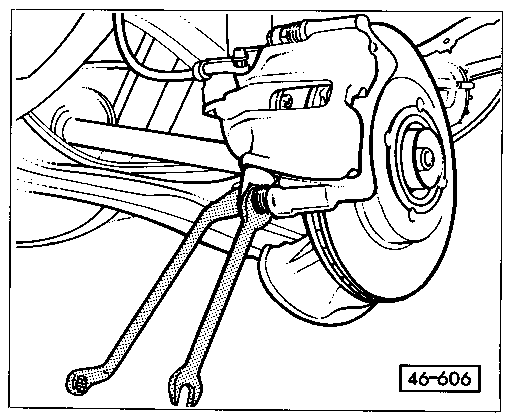
| 2. | Holding the lower guide bushing with an open-end wrench, loosen and remove the lower caliper mounting bolt as shown in Fig. 5-6. |
| Fig. 5-6. | Lower caliper mounting bolt being removed from lower guide bushing. |

|
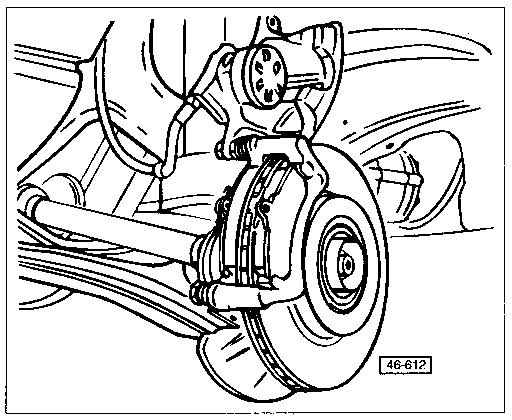
| 3. | Pivoting the caliper on the upper bushing as shown in Fig. 5-7, rotate the caliper upward away from the pad carrier. |
| Fig. 5-7. | Brake caliper pivoted up to remove brake pads. |

|
| 4. | If the disc brake rotors are to be resurfaced or replaced (strongly recommended), remove the two bolts which mount the pad carrier (and caliper) to the wheel bearing housing, and remove the caliper assembly. Suspend the caliper assembly from the car body with a stiff wire to avoid stretching the brake hose. |
| 5. | Lift the pads out of the pad carrier. If the pads are to be reinstalled, mark each pad so that it can be returned to its original position. |
To install:
| 1. | If applicable, reattach the pad carrier/caliper assembly to the wheel bearing housing. On all except with ABS, torque the pad carrier mounting bolts to 70 Nm (52 ft. lb.). On models with ABS, torque the pad carrier bolts to 125 Nm (92 ft. lb.). |
| 2. | When installing new brake pads, slowly push the caliper piston back into the caliper to provide clearance for the new, thicker brake pads. |
NOTE-
Pushing in the caliper pistons to gain clearance for the thicker new brake pads may cause brake fluid to overflow the master cylinder fluid reservoir. To prevent this, use a clean syringe to first remove some fluid from the reservoir.
|
| 3. | Place the brake pads into position on the pad carrier. |
| 4. | Pivot the caliper back down over the pad carrier. Install a new self-locking lower mounting bolt, and torque it to 35 Nm (26 ft. lb.). |
| 5. | Mount the wheel and loosely install the lug bolts. Lower the car and then torque the lug bolts to 110 Nm (81 ft. lb.). |
| 6. | Firmly depress the brake pedal several times to seat the caliper and brake pads to the rotor. |
| 7. | Check the level of brake fluid in the reservoir. If necessary, and new brake fluid to fill the reservoir to the MAX mark. |
WARNING-
New brake pads require some break-in. Allow for slightly longer stopping distances for the first 100 to 150 miles of city driving, and avoid hard stops.
|
|

