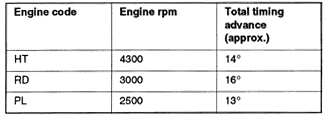
Checking Timing Advance (engine codes HT, RD, PL)On engines with a knock sensor control unit, timing is advanced based on engine rpm and engine load. The signal from the Hall sender serves as the indication of engine rpm. A vacuum hose runs from the intake manifold to the knock sensor control unit so that the control unit can sense engine load. To check rpm-based timing advance, start the engine and let it idle for a few minutes to establish a base timing value in the control unit. Check this base reading with the timing light. Disconnect the vacuum hose from the knock sensor control unit. Raise the engine rpm and compare the maximum timing advance with the values given in Table h. Turn off the engine and reinstall the vacuum hose to the knock sensor control unit. On HT engines, if the values are not as specified, remove the harness connector from the knock sensor control unit and check for continuity between terminal 11 and ground. If there is no continuity, repair the wiring and repeat the test. See CURRENT FLOW DIAGRAMS for current flow diagrams. Timing which does not advance as specified indicates that either the knock sensor control unit or the knock sensor is faulty. See 4.4 Knock Sensor System Fault Diagnosis. for information on using the system's built-in diagnostic capability to help pinpoint the problem. Table h. Maximum RPM-Dependent Ignition Timing Advance (engine codes HT, RD, PL)
Check the vacuum advance function only after determining that the rpm dependent timing advance is correct. Start the engine and increase engine speed to approximately 3400 rpm. Record the amount of timing advance and let the engine return to idle. Remove the vacuum hose from the knock sensor control unit and again raise the engine to 3400 rpm. The timing should advance approximately 6° more than the previous reading. If it does not, check the vacuum hose for kinks or leaks. If the hose is not kinked or broken, then the knock sensor control unit may be faulty. |
