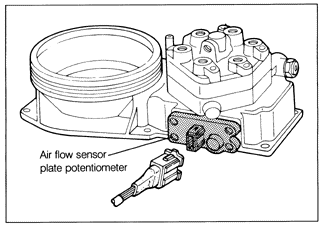
Cold Acceleration EnrichmentTo ensure good throttle response when the engine is cold, the system briefly delivers additional fuel when the throttle valve is opened suddenly. The air flow sensor plate potentiometer, shown in Fig. 6-38, sends a signal to the control unit based on sensor plate travel.
The potentiometer is adjusted at the factory and the mounting screws are sealed. Its operation can be checked by making resistance measurements with an ohmmeter. No adjustment is required unless the potentiometer is replaced. Adjusting a new potentiometer requires the use of an accurate voltmeter. First make certain that the air flow sensor plate is correctly adjusted, as described in 6.1 Air Flow Measurement and Fuel Metering.
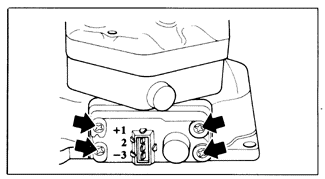
To test cold acceleration enrichment, disconnect the coolant temperature sensor harness connector and remove the black rubber intake air boot from above the air flow sensor plate. On engines with throttle valve switches (code letters HT, RD, and PL), open the throttle so that the idle switch is not contacted by the throttle lever. Turn the ignition on and quickly raise the air flow sensor plate to its stop. The differential pressure regulator current should briefly exceed and then return to the cold running enrichment value given above. Turn the ignition off and reconnect the temperature sensor harness connector. To check the potentiometer's operation, detach the harness connector and use an ohmmeter to measure resistance between terminals, as shown in Fig. 6-39. The resistance between terminals 1 and 2 should be greater than 4000 ohms. The resistance between terminals 2 and 3 should be less than 1000 ohms. Check the resistance between terminals 2 and 3 while slowly and evenly lifting the sensor plate. The resistance should steadily increase, without any flat spots, to approximately 4000 ohms. A potentiometer which does not perform as specified is faulty and should be replaced.
To replace the potentiometer, remove its mounting screws and pull it from the fuel distributor. Install the new potentiometer with the mounting screws, leaving them just loose enough to allow some position adjustment. Lift the air flow sensor plate until it is flush with the narrowest point in the air cone, as shown in Fig. 6-40, and hold the plate steady in this position.

On all except 16-valve engines, adjust the position of the potentiometer until the voltage between the center terminal and ground is 0.2 to 0.3 volts. On 16-valve engines only, adjust the position of the potentiometer until the voltage between the center and bottom terminals is 0.02 to 0.2 volts. Carefully tighten the mounting screws and recheck the voltage reading. Raise the sensor plate fully to its stop. The voltage should increase to approximately 7.0 volts. If not, check the rest position of the sensor plate and recheck the initial position setting of the potentiometer. |