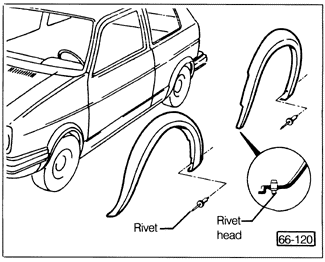
Removing and Installing Body TrimBody trim includes the wheelhouse trim pieces, the fender stone guards, the roof moldings, and the body side moldings. When replacing a roof molding, special Volkswagen tools may be necessary. A rivet gun is needed when installing wheelhouse trim. Replacement rivets are available from an authorized Volkswagen dealer. To remove full-length wheelhouse trim, either drill out or pry the rivet heads from the rivets. See Fig. 6-13. With the heads removed, drive out the rivets, then remove the trim. Use one of the old rivets for comparison when purchasing new rivets. When installing the trim, begin with the center rivet at the top of the wheelhouse.

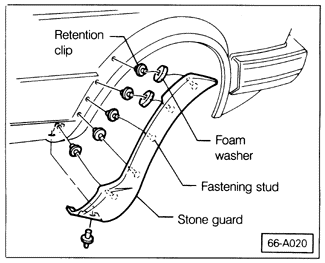
To remove stone guards, pry the fastening studs on the guard away from the retention clips as shown in Fig. 6-14. On Jettas, the stone guards are additionally held by two rivets at the top and bottom of the guard. Drill out or pry the rivet heads off, then drive out the rivets. Use an old rivet for comparison when purchasing new rivets. On some 1985 Golf models, loose stone guards may be caused by faulty retention clips. Revised retention clips (part no. 191 853 615) and foam washers (part no. 191 853 616) are available from an authorized Volkswagen dealer.

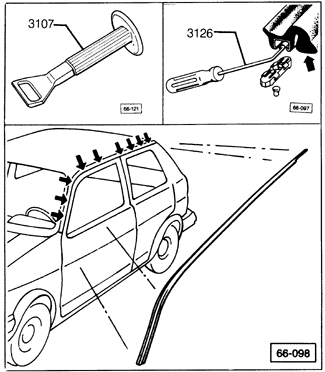
To remove a roof molding, pull the molding outer lip from the body of the car. Using the special tool or equivalent, spread the molding enough to remove it from the clips. See Fig. 6-15. Work from the rear of the car forward. Replace any clips that are damaged. Before installation, lightly lubricate the inside of the molding. Install the molding from the front of the car back, using the special tool to spread the molding. Position the molding so that there is approximately a 2.0 mm (5/64 in.) gap between the outer sealing lip and the B-pillar on 2-door models, or the the outer sealing lip and the C-pillar on 4-door models.

To replace a body side molding on 1985-1987 cars, use a heat gun and carefully heat the molding to soften the adhesive backing, then pull the molding from the car. Clean the mounting area on the body with a grease and wax removing solvent. Heat the molding and the body area to approximately 95°F (35°C), then remove the backing from the adhesive strip and correctly align the molding. Check that the ends are securely glued. Body side moldings on 1988 and later cars are mounted with retention clips that snap out from the body for removal. Underbody side skirts on 1990 and later Jettas are screwed to the wheelhouse trim and clipped to a retaining strip. The retaining strip is bonded to the underbody by adhesive. |