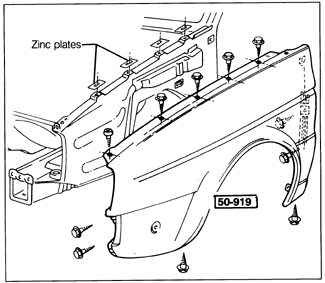
Removing Front Body Parts and GrilleFig. 6-9 is an exploded view of the front grille and related body parts. Remove the plastic grille and lower grille simply by unclipping them. The apron, the spoiler, and the radiator support are held in place by mounting screws. To remove the radiator support, disconnect the hood release cable from the hood latch, and disconnect the horn and headlight electrical connections. On GTI models, the front spoiler has an integral air duct connected to the brake cooling duct by a rubber bellows. See Fig. 6-10. To remove the front spoiler, first pry the rubber bellows back from the air duct and then remove the spoiler screws and speed nuts. When installing, loosely install the spoiler and screws and speed nuts, fit the bellows on the air duct, and then tighten the screws and nuts. To replace a fender, first remove the front bumper as described below. Carefully use a heat gun and razor knife to cut through the PVC coating along the A-pillar where the fender meets the body. Remove the mounting bolts shown in Fig. 6-11 and remove the fender. During installation, install the zinc plates and sealing tape as shown above in Fig. 6-8.


To replace a wheelhouse liner, support that corner of the car securely on a jack stand and remove the wheel. Remove the mounting screws shown in Fig. 6-12. On GTI models, the brake cooling duct must be detached from the liner by removing the two mounting screws and one clip, and prying the rubber bellows off of the air duct. See Fig. 6-10 above. Remove the liner first from the guide, and then pull it from the body. Installation is the reverse of removal. Torque the wheel bolts to 110 Nm (80 ft. lb.) after lowering the car to the ground.

To remove the hood, first mark the hinge plate locations on the hood for reinstallation. Loosen the mounting bolts, then with a helper supporting the opposite side, remove the bolts. Install the original hood by aligning the matching marks made earlier. If installing a new hood, loosely install the mounting bolts and adjust the hood so that it contacts the body evenly. During installation, install the zinc plates and sealing tape as shown above in Fig. 6-8. |