5.2 Removing and Installing Clutch
The transaxle must be removed from the engine to gain access to the clutch. See 6.3 Removing and Installing Transaxle. It is normally recommended that the pressure plate be replaced when a new clutch disc is installed. If the clutch pressure plate is removed from the crankshaft, new mounting bolts should be used to reinstall it.
The flywheel should be carefully inspected when replacing the clutch. Replacing the clutch disc without replacing other worn components may accelerate clutch disc wear. Be sure to inspect the clutch pushrod bushing and seal (see Fig. 7-19) and replace any worn parts.
An inexpensive alignment tool is used to install and center the clutch disc. Use of this tool or its equivalent will greatly aid the installation of the transaxle. For 16-valve engines, use Volkswagen special tool no. 3178 (order no. T03 178 000 30 ZEL). For all except 16-valve engines, use Volkswagen special tool no. VW 547 (order no. TV0 547 000 30 ZEL).
Some lubrication is recommended when reassembling the clutch. To avoid accelerated failure of the new parts, use only the Volkswagen-recommended lubricants. If signs of oil are present at the bottom of the transaxle, carefully inspect the rear crankshaft oil seal while the clutch is removed. A faulty oil seal should be replaced.
NOTE-
 | A transmission that is difficult to shift may be caused by a binding cable or linkage, or by clutch disc splines binding on the transmission input shaft. If cleaning and lubricating the splines does not correct the problem, a clutch disc with nickel-plated hub, Volkswagen Part No. 027 141 032 F, is available for installation. |
| Part numbers are for reference only. Always check with an authorized Volkswagen parts department for the most up-to-date parts information. |
|
To replace clutch:
| 2. | Remove the flywheel, clutch disc, and release plate. A holding fixture, Volkswagen special tool number VW 558 (order no. TV0 558 000 13 ZEL), is shown in Fig. 5-5. Loosen the flywheel mounting bolts evenly, one-quarter turn at a time, until the clutch pressure is relieved. Remove the flywheel and the clutch disc. |
| Fig. 5-5. | Holding fixture being used while loosening fly-wheel bolts. |

|
| 3. | Use a screwdriver to pry out the retaining ring for the clutch release plate. |
WARNING-
The retaining ring is a spring which will be released with some force. To avoid injury, hold on to it firmly while prying it loose.
|
| 4. | Remove the six center mounting bolts and remove the clutch pressure plate from the crankshaft. Use of the holding fixture is illustrated in Fig. 5-6. |
| Fig. 5-6. | Holding fixture used to remove clutch pressure plate assembly. |

|
To inspect and install:
| 1. | Inspect the clutch pressure plate. Check the release levers for bending or misalignment. Using a straightedge as shown in Fig. 5-7, check that the mating surface does not taper inward more than 0.20 mm (.008 in.). Check to see that no rivets are loose. Carefully inspect the friction surface for cracks, scoring, discoloration due to heat or oil contamination, or other damage. A clutch pressure plate showing any of these signs of damage should be replaced. |
| Fig. 5-7. | Pressure plate being checked for taper. If feeler gauge over 0.20 mm (.008 in.) can be inserted between pressure plate and straightedge on inside edge, pressure plate should be replaced. |
|
| 2. | Clean the flywheel friction surface and inspect it for wear, cracks, and grooves. Check for loose or worn dowel pins. Replace a flywheel with any of these faults. |
| 3. | Check the thickness, runout, and general condition of the clutch disc. See Fig. 5-8. If runout exceeds 0.5 mm (.02 in.), or if there is any evidence of contamination by oil, the disc should be replaced. |
| Fig. 5-8. | Dial indicator being used to measure clutch disc runout while disc is rotated. |

|
NOTE-
The clutch disc is a relatively low-cost part which commonly wears out and requires replacement. Many experienced mechanics routinely install a new clutch disc anytime the transaxle is removed.
|
| 4. | Inspect the splines of the clutch disc and the transmission input shaft. Check that the clutch disc is free to slide on the shaft. If the clutch disc is in any way unserviceable, it should be replaced. Clean all traces of grease from the shaft and clutch splines. |
| 5. | Position the clutch pressure plate on the crankshaft. Using thread locking compound on new bolts, position the washer and thread the bolts into place. The holding fixture shown earlier in Fig. 5-6 can be used to hold the pressure plate. Torque the bolts to 30 Nm (22 ft. lb.) plus 1/4 turn (90°). The additional turn can be done in more than one step. |
CAUTION-
Always use new pressure plate mounting bolts. Once torqued, they are deformed and should not be reused.
|
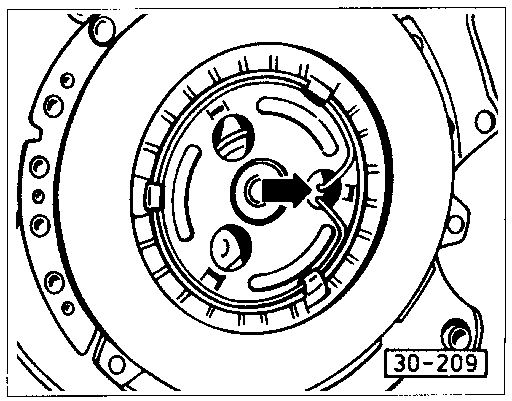
| 6. | Place the clutch release plate in position and install the retaining ring. Lightly lubricate the contact surface of the plate and the center seat for the clutch pushrod with lithium grease. Align the ends of the retaining ring as shown in Fig. 5-9. |
| Fig. 5-9. | Installation of clutch release plate retaining ring. Ends of ring rest in hole of release plate (arrow). |
|
| 7. | Lightly lubricate the transmission main shaft splines and the clutch splines using molybdenum disulphide grease, Volkswagen part no. G 000 100, then place the clutch disc inside the flywheel. |
CAUTION-
Use only the recommended molybdenum disulphide grease on the splines. Otherwise the clutch disc may bind on the input shaft and cause hard shifting. Other lubricants may contaminate the clutch disc.
|
NOTE-
The projecting part of the clutch hub faces the flywheel, away from the engine.
|
| 8. | Install the flywheel. Position the flywheel on the dowel pins and start the mounting bolts in their holes. Leave the bolts loose enough so that the clutch disc can still move. |
CAUTION-
The two guide pins in the flywheel must align with the corresponding holes in the clutch pressure plate, or the pressure plate will be damaged during installation. Do not mistake balancing holes for guide pin holes.
|
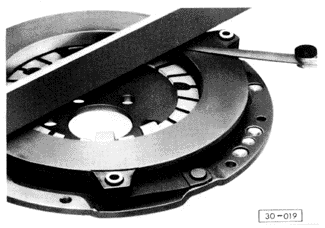
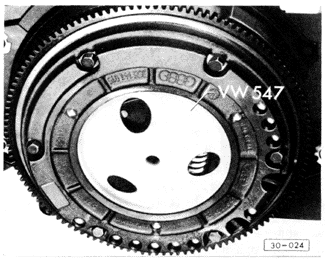
| 9. | Center the clutch disc. The Volkswagen special tool used to accurately center the disc is shown in Fig. 5-10. Tighten the flywheel mounting bolts evenly until the clutch disc is firmly held in place. |
| Fig. 5-10. | Clutch disc being centered in flywheel with centering tool, Volkswagen special tool no. VW 547 (order no. TV0 547 000 30 ZEL). For 16-valve engines, use Volkswagen special tool no. 3178 (order no. T03 178 000 30 ZEL) |
|
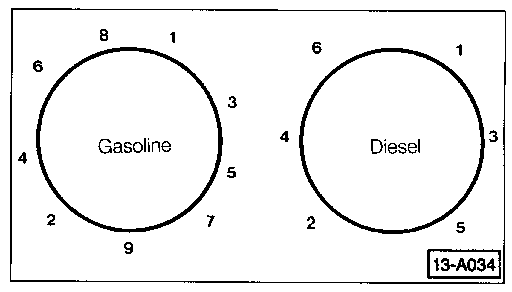
| 10. | Remove the centering tool, if used, and torque the bolts to 20 Nm (15 ft. lb.). in the sequence shown in Fig. 5-11. |
NOTE-
New replacement flywheels for gasoline engines have no timing mark. They are marked only with a 0° TDC mark. Before installing, make a timing mark as shown in Fig. 5-12.
|
| Fig. 5-11. | Flywheel bolt torque sequences. |
|
| Fig. 5-12. | Location of timing mark to be made on new replacement flywheels. Dimension a (arc length) is 12 mm (0.472 in.). |

|
|