Inspecting and Replacing Control Arm Ball Joints
The ball joints should be checked regularly for freeplay. A simple inspection of the ball joints involves using a pry bar to check freeplay and a caliper or ruler to measure it. Replacing a ball joint requires a new lockplate and bolts and, following the repair, a wheel alignment.
To inspect:
| 1. | Lift the front end of the car and support it securely on jack stands which are designed for the purpose. |
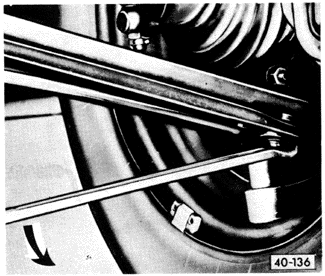
| 2. | Place the tip of the pry bar directly under the socket of the ball joint, and place the metal spacer between the shank of the pry bar and the wheel rim as shown in Fig. 5-22. |
| 3. | Check for movement of the ball joint socket relative to the wheel bearing housing. Replace any ball joints that can be compressed 2.5 mm (.10 in.) or more. For reference, the freeplay in new ball joints is about 1.0 mm (.04 in.). |
| Fig. 5-22. | Checking ball joint wear with pry bar on ball joint, and spacer on wheel rim for use as support. Moving lever (arrow) will compress joint. |
|
To replace:
| 1. | With the front of the car raised and supported securely on jack stands, remove the wheel. |
| 2. | Disconnect the stabilizer bar link rod from the control arm. |
| 3. | Loosen and remove the clamping bolt that holds the ball joint stud in the wheel bearing housing, and then pull or pry the stud out of the housing. |
NOTE-
If the old ball joint is to be reinstalled, mark its position on the control arm for reinstallation. Use a marker. Do not scratch the paint.
|
| 4. | Remove the three bolts holding the ball joint to the control arm, and remove the old ball joint. Remove the lock-plate from the top of the control arm and discard it. |
Installation is the reverse of removal. Install the new ball joint as shown in Fig. 5-23, using M8 x 24 bolts and a new lock-plate. Torque the bolts on all models except Jetta 16V to 25 Nm (18 ft. lb.), and on Jetta 16V to 30 Nm (22 ft. lb.). Torque the stabilizer bar link rod nut to 25 Nm (18 ft. lb.) and the ball joint clamping bolt to 50 Nm (37 ft. lb.).
CAUTION-
The position of the ball joint in the slotted mounting holes is set during manufacture to match drive axle length. When installing a replacement ball joint, position the joint in the center of the slotted mounting holes.
|
| Fig. 5-23. | Replacement ball joint being installed on control arm. Center replacement ball joint in slotted mounting holes. |

|
|